Category Archives: Geek-Speak

Geeky spaces lie within — be careful where you step!

Photoshop CS5 Beta

A few weeks ago, I was selected to join the Photoshop CS5 Beta team. This was quite an honor, and I owe it all to my NAPP membership. Way cool opportunity!

While I can’t speak to features — NDA, ya know — the beta testers have been released to talk about the fact that Photoshop CS5 is out there, and show off some of the work we’ve done with it. Below is a before and after piece that I’ve been working on. All I can say is that Photoshop CS5 seems to really rock, and saved me a TON of time in working through the “after” image.

The kickoff event comes April 12th — can’t wait ’til then, and for the new product!

New Gear : Tracks Sherlock Travel Staff

Last week’s hike in slightly sloppy conditions pointed two things out to me. There was beauty to be found in the mud, and I needed a hiking staff of some kind. Late in the hike, I slipped in some mud and almost went down with my camera and backpack of lenses. That wouldn’t have been good.

I did some research this week to find out more about staffs. I knew I didn’t want trekking poles (pairs, used like snow skiers use their poles). I’d seen a ton of wooden ones while we were out west a couple of years ago. Those looked nice and would make a good home for the hiking medallions I’ve been picking up during our travels, but I wasn’t sure that that would be the right answer for something versatile in the field.

The more I looked, the more I realized that there weren’t great differences from one staff to the next. My needs were pretty simple — adjustable height, spike on the bottom for sloppy conditions, and a basket to keep from sinking up too far. With that in mind, Becky and I went to the Alpine Shop in our neighborhood to look for a staff. We were helped by Andy, who made me feel right at home, and frankly, was built like me, so I figured he could give me some real world advice about what I was getting into. He did, and I ended up walking away with a Tracks Sherlock Travel Staff.

This is a pretty slick tool with some nice features above what I was looking for. First off, it breaks down into three component pieces, and comes with a sack to carry them around. For the long haul trips I’m used to, that’s a great feature. A wood hiking staff wouldn’t be collapsible, meaning I’d have to find some way of carrying this long pole in the Jeep. With the Sherlock, no problemo.

The Sherlock sports a walnut knob for gripping the top of the staff. While that’s nice, what’s nicer is that it screws off, revealing a kinda long 1/4″-20 screw for mounting a camera atop the staff for use as a monopod. My only complaint here is that the screw thread is long, perhaps by as much as a quarter inch. That length is probably needed for the knob, but seems a little dangerous for a camera. I’d hate to keep up with it, but it might make sense to carry a little washer as a spacer when using the staff as a monopod.

The Sherlock also has a removable foot, revealing the spike I was looking for. The foot’s kinda neat, leaving a paw print behind as you move along, and seems useful for hard surfaces. The spike is ginormous, and appears to be quite useful as a weapon should your need to stab something or for picking up trash along the trail.

This thing really seems to hit all my design points, and then some, and I believe it’ll be quite a nice addition to my hiking!

More on Adobe Camera Raw

After spending most of last weekend playing with various RAW converters — both for output and speed — I finally believe I found the foundational problem in my workflow. ACR was defaulting to Adobe Standard as the camera profile. There were also some other settings that needed tweaking as my defaults, but this was the root of my evil problems. I remember long ago making a change in ACR that had things coming out of it looking good, but somehow with the loading of ACR 5.6, my settings went bye-bye. Or it could’ve been the addition of images from my new 7D. No matter, it’s more or less resolved now. (Thanks Tim!) [BTW, Tim is also doing a Project 365 exercise.]

Of course, ACR can do tons to the image, and this weekend, I swallowed my ignorance, and purchased Real World Camera Raw with Adobe Photoshop CS4. I’ve plowed through the foundational chapters, not yet touching a single control. But that day is coming, and I really do feel more confident in treating ACR as another tool in the workflow, rather than a Ron Popeil “set it and forget it” gateway through which my RAW images stroll.

Gettin’ RAW

As I’ve delved more and more into the RAW images coming from my Canon EOS 7D, I’ve discovered that Adobe Camera RAW 5.6 just ain’t cutting it for me. The preview JPG images I briefly see in Lightroom 2.6 look much more like what I expect from my images, rather than the post-ACR images that are actually used for real work. Digital Photo Professional came with the 7D, and it sure seems to kick ACR’s backside with its RAW conversion routines. Now, there are folks out there who say that the camera manufacturer (in this case, Canon) should have the inside track on RAW conversion, and historically, I’ve just taken that as hype. Color me a believer now.

With the advent of the new year, I’ve decided to whittle away a bit of time to do some searching and comparing of various RAW converters for the Mac platform. Most of these comparisons will be done on a non-stellar image of a seagull shot last weekend at Winfield, and will be done with trial versions of the various packages on hand. I know other folks have done these kind of comparisons before, but frankly, they aren’t me, and the images aren’t mine. In other words, YMMV. Lather, rinse, repeat. 🙂

This ain’t exactly scientific, and everything I’m describing and posting is my own experiences with my Snow Leopard-based MacBook Pro running 10.6.2. The source image was shot with my 7D, my 100-400L at 400mm, handheld, IS on, f/5.6, 1/400 sec, ISO 400, and “cloudy” white balance selected. It was a grungy day, and the gull was at some distance over the river.

I’m sure there are settings I can change here and there to make some of these images better in these various packages, but that’s not the point. I’m ready, willing and able to work on my images to get them polished how I’d like, but running with default settings from these various converters is how I’d like to start. If I start out closer in the conversion process to how I expect the image to look, then that’s (potentially) less work in front of the screen, and more time left for photographing.

Where I could, I’ve tried to do my screen captures from a 100% rendering of the sample image. For each app, I did screen grabs from within the app’s UI as TIFFs using the Mac’s built-in Grab utility.

All that said, here goes.

Digital Photo Professional 3.7.3.0

DPP 3.7.1.2 shipped with my 7D, and the only thing that’s bugged me is a problem with the preferences panel causing the software to abend whenever it’s accessed. There is a solution that I found here on an Apple forum that absolutely fixes the issue. However, there is also v3.7.3.0 version of code available, and for this test, I downloaded it from Canon to see how it fared. I still don’t like that the Canon software requires a reboot of the Mac in order to function correctly (so it claims). I mean, really, reboot the machine? But the good news is the v3.7.3 does solve the preference panel problem.

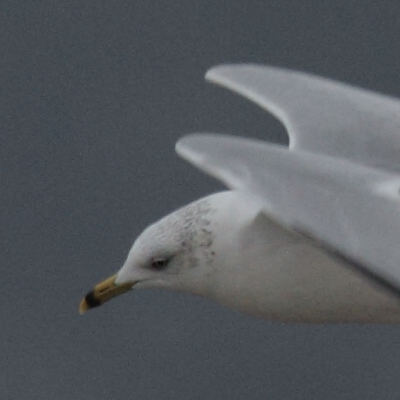
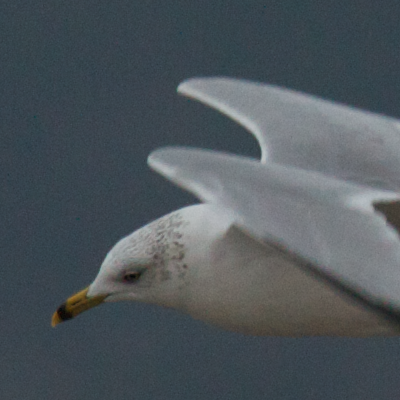
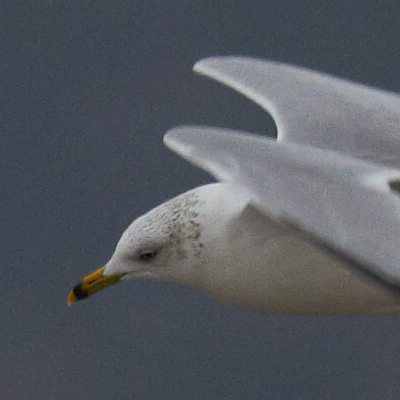
As a point of reference, the image in DPP compares pretty favorably to the embedded JPGs I would see briefly in Lightroom 2.6. In other words, this is the look I was seeing on camera (again looking at the JPGs according to how I understand things to work) and briefly in LR 2.6, and this is the look I was disappointed to lose inside LR after ACR did its work.

Below is the crop of the image from DPP.

Adobe Camera RAW 5.6

This is what started the whole fuss for me. Well, actually, it was Lightroom 2.6, which uses ACR 5.6 as its underpinning for processing RAW files. However, to be fair, I wanted to pull ACR 5.6 away from LR 2.6, just to ensure that there was no hocus-pocus going on with LR 2.6.

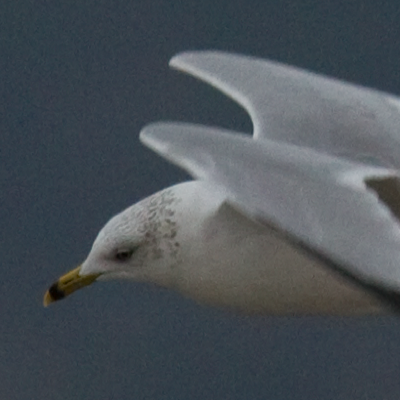
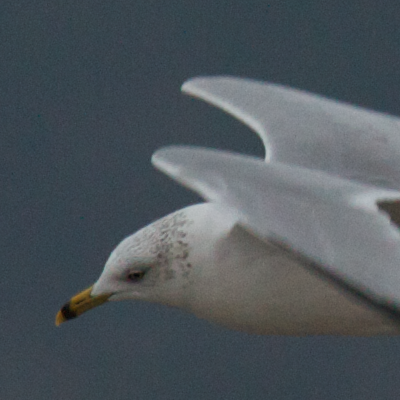
To my eyes, there’s a significant color shift or darkening — not sure which. It’s very noticeable in the background. There also appears to be quite a bit more noise in the image, although some/all of that could be the fault of the color shift. However, the noise could be being introduced due to some kind of sharpening. If you look at the top of the gull’s head and compare it to DPP, it’s definitely sharper, but I’m afraid the cost for that may be too high.

Below is the crop of the image from ACR.

Lightroom 2.6 + Adobe Camera RAW 5.6

After finally understanding (I think) why my RAW images looked great upon import into LR 2.6 (the embedded JPG previews were being shown) and worse after a few seconds (after LR engaged ACR to properly process the RAW file), this is what I was left with. Blecch.

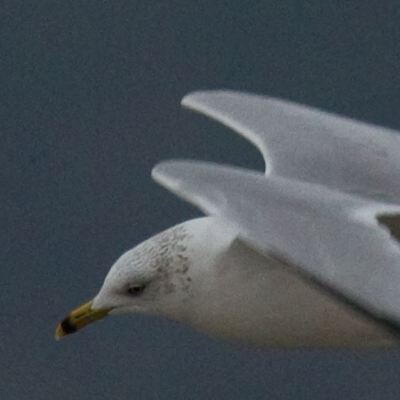
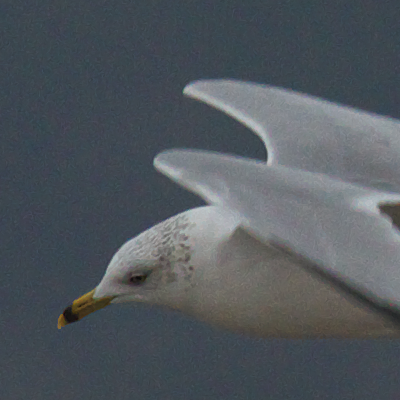
From what I can tell, there’s no huge difference between images in ACR 5.6 and LR 2.6+ACR 5.6, although the one through LR 2.6 may be a tad lighter.

Below is the crop of the image from LR 2.6.

Lightroom 3.0β + Adobe Camera RAW 6.0

Adobe is working on a pretty big revision to Lightroom, and currently there’s a beta version of it, along with a new Adobe Camera RAW to go along with it. For me, one of the biggest wins with LR 3.0 may be some changes to help handle large catalogs. At this point, I don’t know what that’s gonna look like, but it definitely piques my interest.

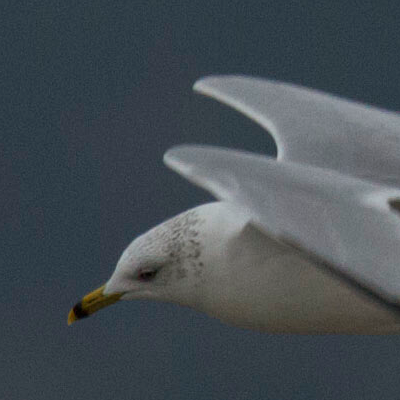
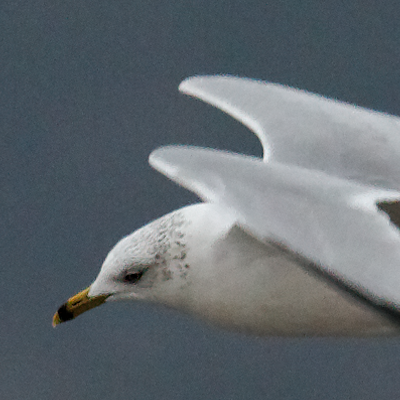
From a RAW processing perspective, there’s a little bit of difference between LR 2.6+ACR 5.6 and LR 3.0β+ACR 6.0. LR 3.0β seems to have a “different” kind of noise in the background — speckly instead of blotchy. The gull’s head appears just a tick brighter to me, as well. I probably like the speckles better than the blotches, but it’s still not as good as DPP to me.

Below is the crop of the image from LR 3.0 Beta.

Apple Aperture 2.1.4

Apple has its own rendering engine for dealing with RAW files, and it has recently been updated to deal with the 7D’s RAW files. Frankly, I like the look of this image better than through Adobe’s products. It’s still just a tick darker than the image through DPP, but would probably not have sent me on this quest had this been the result through LR 2.6+ACR 5.6.

Below is a crop from Aperture.

Preview 5.0.1

It’s my belief that both Aperture and the Snow Leopard share the same engine for converting RAW files, but I figured it made sense to include a pretty common display engine for RAW files. I can’t imagine that Preview would be part of my workflow, but until you look at it, ya never know!

To my eye, there’s not much difference between the image in Aperture and Preview. Perhaps they really are using the same engine underneath.

Below is a crop from Preview.

Silkypix 3.0.34.1

Before I’d started this quest today, I’d never heard of Silkypix. Their engine seems to still be better than Adobe’s, but there’s still a darkening as compared to DPP that I don’t care much for.

Below is a crop from Silkypix.

DxO Optics Pro 5.3.6

I’ve seen DxO advertised for a long time, and hadn’t really thought of it as a RAW converter. In my head, it was a bigtime piece of code that could take lens characteristics and deal with those in an image. From doing the installation today, I’ve learned that it can handle specific camera and lens combinations, and convert RAW files based on their profile data. Pretty cool stuff.

The installation for DxO is much more complex, allowing you to select only the bodies and lenses that you might run into. I think that’s probably a good thing, and I imagine it probably cuts down on the disk utilization.

I’ve gotta say, DxO really rocked out the image. The gull is clean, bright and crisp. It almost looks as though it applied some kind of auto-balancing to the image — it is a dark image, after all. It looks the way I would expect it to be processed eventually anyway, and that’s pretty cool.

Below is the crop from DxO Optics Pro.

Capture One 5.0.1

Capture One is another name that’s familiar to me from adverts. I’ve read about loads of folks using them for their conversion, and I wanted to give them a whirl to see what the hubbub was about.

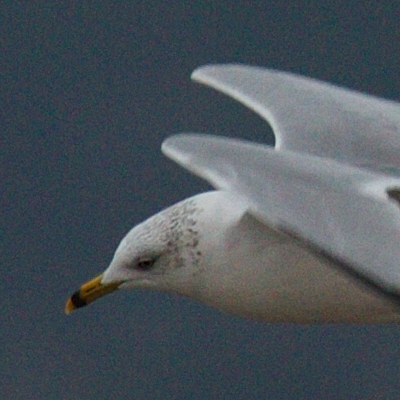
Comparing the images from DPP and Capture One, I notice the same things in the Capture One image that I liked about the DxO-based image. However, comparing the DxO and Capture One images, the DxO image looks “hot” to me. Add to that that the detail atop the gull’s head appears clearer in the Capture One image, suddenly Capture One starts to look pretty attractive.

Below is the crop from Capture One.

RAW Developer 1.8.7

This was another tool I’d never heard of before. To my eye, it appears much like the ACR-based images. Unfortunately, that’s just not the look I’m looking for.

Below is the crop from RAW Developer.

RAW Photo Processor 4.0.1

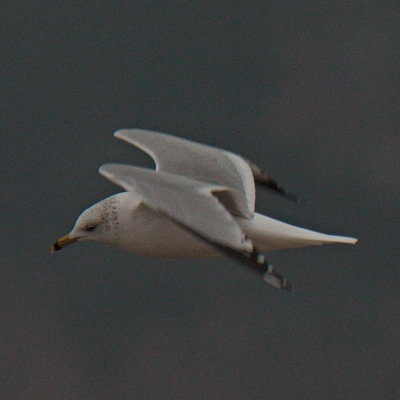
Yet another tool I’d never bumped into before. RPP seemed to make my image quite dark compared to DPP. I couldn’t compare the sharpness too well, as I couldn’t figure out how to get to a 100% image in the UI. I’m sure there’s a way, but it wasn’t obvious to me.

Below is the crop from RPP.

Observations

To me, from the out-of-the-box experience, I see it as a three horse race: Digital Photo Professional, DxO Optics Pro, and Capture One. Comparing the three images, I really like the one from Capture One the best. It appears that Capture One is doing some sharpening, but it’s not crazy high, and appears to make the image a little nicer overall.

Both DxO and Capture One do have a little color shift to the blue, which leads me to believe that they are doing some kind of tweaking of the white balance. It’s not horrid like ACR’s though, although it appears to be of a similar nature, strictly based on the color of the background.

I’d bet that both DxO and Capture One could be tweaked a bit to get images that look like the ones from DPP. So why switch? Well, DPP is really clunky and slow. I’d like to see something fill my harddrive with TIFFs a bit quicker than DPP can manage.

However, DPP is free — well, it came with the camera, so “included” is probably the better term. DxO is running a special for $109 through Tuesday for v5.0.1 standard edition (which supports the 7D) and will include a free upgrade to v6 when it hits for the Mac later this year. Capture One 5 is $129. Frankly, I’m seduced by what DxO claims it can do with lens/camera profiling. Capture One appears to be able to do that in the Pro edition, but that’s nearly $400.

I’ve got a couple of weeks before the demo versions run out, but with the sale at DxO running, I guess I’ll spend some time tomorrow running some comparisons on batch processing. Stay tuned!

If It’s Cold, It Must Be Time for the Eagles

I took today off, and headed up to Winfield in search of bald eagles. I figured with the cold we’ve had, and the incredible cold we’re about to have, they might be down river far enough for us to see them. There were a few — maybe ten or so that I spotted — along with loads of gulls and even a couple of herons.

This was the first real opportunity to photograph things in motion with the 7D, and I’ve got to admit that 8fps just flat rocks for photographing birds winging their way around the river. However, it’s well worth noting that at 8fps, it’s real easy to fill CF cards quickly. I have only one large card, along with several small ones, and that’s a situation that’s gonna have to change. There are some nice deals out there on 16GB and 32GB cards…

Another thing of great interest that I’ve noted with the 7D. For a several years, I had some issues with my Canon 100-400 L lens triggering Err99 messages on both the 20D and 40D when the lens’ IS system was on. Turn it off, and there’s no problem. I’ve read a ton of information about an apparently large number of folks who have observed the same thing. Today was the first time I’d shot at length with the 100-400 on the 7D, and guess what? No Err99 messages. None. Not once. I don’t claim to understand why that is… Is the 7D more tolerant of whatever condition the 20D and 40D were noticing? Has the 100-400 mysteriously fixed itself? Dunno. But it was a joy to be shooting with the IS on again on the jewel of my lens collection!

Canon EOS 7D : Focus on Focusing

As I hinted at a few weeks ago, there’s a new camera in the Deauxmayne — a shiny new Canon EOS 7D, kitted with a Canon 28-135/3.5-5.6 IS USM lens. I expect this will be the first of several pieces where I describe my real world experiences with this really nice camera.

Yesterday, trying to take advantage of a very light snowfall, Casey and I decided to get together just before sunrise to do a little shooting. This was the first real excursion for the 7D, and needless to say I was excited. It was cold, cold, cold and windy, making for miserable air conditions. However, the sky was gray, and I thought that might help keep the shadows to a minimum for stuff on the ground. We wound up at MoBot, and I spent the biggest part of my time photographing some of the water features that wander through the garden. I fired off what looked to be terrific shots with the new camera, using both the kit lens, and my trusty 100-400/4.5-5.6L IS USM lens.

After almost five hours in the cold, I came home, got some lunch, warmed up, and began to download images from my card.

One thing I noticed right away was that I had almost 500 images on the card. That seemed odd, as I was pretty sure I hadn’t blasted away with quite that frequency. The key was something I noticed while shooting. I was using the “cloudy” white balance setting, and noticed that the cloud indicator on my panel was blinking. That was weird. What I discovered (after I got home) was that I had accidentally set up bracketed white balance when I was trying to set up bracketed exposure. Not a biggie, but it was a bit of a mystery. This meant that almost everything I shot actually recorded three images using this bracketed white balance. I didn’t even know you could do that. Cool, and something I’ll have to play with in the future.

I imported my images into Lightroom 2.6 (freshly updated with support for the 7D), and noticed that most of my shots were soft. Now, I know that the 28-135 isn’t an L lens, but I was surprised to see so much softness, especially since I had manually focused everything, and most of the images have their focus “fine tuned” using live view. While it didn’t ruin my photos, it did make them just too soft for my tastes.

Today, I decided to experiment to see if I could reproduce the problem.

I decided to enlist the help of a fantastic model for trying to figure this issue out. He’s got loads of character, and doesn’t complain about the pay. 🙂

The setup was essentially the same as I used outdoors at MoBot — 7D, 28-135 (zoomed to 135mm), two second self-timer, ISO 160, f/8. I shot three images — one using autofocus (something I didn’t do in the field yesterday), one using manual focus fine-tuned with live view, and one using manual through the viewfinder. Here’s what I found. (Click on the images below to see the full size crops of the samples I shot.)

The autofocus shot was easy. The 7D chose to focus on the upper left part of my model’s hair, and from what I could tell in the zoom up of the shot, it seemed to nail the focus.

The manual focus shot was just as easy. However, here the “human element” of my eyes starts to have potential of influencing the results. I did the best I could, and focused on the nose of my intrepid model.

And last was the manual focus using live view to help dial in the focus. Again, my target was the nose.

From this series of images, it was obvious that autofocus was working fine, manual focus using my eyeballs was good, but manual focus using live view was obviously not focusing on what the screen indicated was being focused on. From my best guess, it appears that manual focus using live view actually brings a clearer image from a little farther away than what is being seen on the screen on the back of the camera. You can see this by looking at the hair on the upper left of the model.

So, what do I do about it? Well, some research about live view and its limitations, more trust of my eyeballs through the viewfinder (and the new 100% coverage viewfinder in the 7D rocks), and more trust of the autofocus system in the camera. It sure seems weird that what you see on the screen is not what you get.

Stay tuned…

Update #1 : I neglected to mention the dedicated live view button. This is a tremendous improvement over the implementation on the 40D. And I should probably mention why live view focus assistance for manual focus is so important to me. When I’m shooting macro work, I really wanna nail the focus within the plane of focus in those tight quarters. Live view helps with that because I can zoom the image 10x over what I can see through the viewfinder, helping me get the focus right where I want it.

Update #2 : The lens in question I had done a rough AF Microadjustment to via the Custom Function menu. This lens (as well as the rest of mine) needed an adjustment of -7. I did this using a test screen on my laptop, as suggested by several folks on the web. I recognize that this isn’t likely the best scenario, but it’s what I had available to me. The interesting thing is that when I turn off the AF Microadjustment for that lens, my focusing with live view seems to be more what I see on the screen. It almost implies that the camera is making an adjustment, based on the AF Microadjustment data, despite the lens sitting in manual focus mode, but only when used with live view.

Of course, I could be all wet on this.

Canon 7D and Software Updates

Having had my Canon 7D for a few weeks, I can safely say that I really like it. Not yet love it, but I like. Why not love? Well, I just haven’t had enough time to exercise it enough to fall in love. I’m in love with its potential, but I haven’t realized that potential practically yet. Mine own dang fault… along with the fact that there’s only 24 hours in a day. Dumb ol’ plantary rotation.

One thing that frankly had kinda slowed me down from getting too far down the path for making gobs of shots was that Apple’s Snow Leopard and Adobe products weren’t quite there with support for the new RAW format from the 7D. There’s been a release candidate for Lightroom that supported it, but after reading some of the forum info about that RC, I was concerned that I might end up having to re-import my images or some such nonsense to get them correctly rendered in the future production version of LR when it was released.

Today, both issues are solved: Adobe has released LR 2.6 officially, and Apple has update Snow Leopard to handle the 7D’s RAW files. Both are great news for me, and just in the nick of time.

Tomorrow morning, a gaggle from work are getting together at Forest Park to photograph, and it’ll be the first real world test for me with the 7D. Now that my tools are up to snuff for reading the images I’ll create, that just makes the pot sweeter. Woo-hoo!

I’d be remiss if I didn’t put my Grandpa Simpson voice on and mention the speed of the upgrades. I was downloading the almost 100MB upgrade to Lightroom at just a tick over 1MB/sec. That would’ve been just about one 3.5″ floppy disk every second for just under two minutes. It’s crazy to think about moving that kind of data around that quickly. And man, am I loving it!

Now to go to the camera store and see if there’s any used lenses I need! 🙂

Dreamhost Had An Outage Today…

And, looking at Twitter, you woulda thought the world was coming to an end. And it was only thirty minutes. But, in thirty minutes, the what seemed like the entire Twitterverse began screaming about how bad Dreamhost was.

Adding fuel to all that yelling and screaming was the following brief update on the Dreamhost status site indicating they’d Be Right Back:

Be Right Back

From reading some of the comments from Dreamhost afterwards, it sounds like the status server was getting pounded (probably all the folks from Twitter! 🙂 ). I am thrilled that the folks at Dreamhost were trying to get the users up, and throwing up a static page so folks would know they were still alive. That seems like the right priority to me.

Ya know, at the end of day — for me anyway — no one died, no country was overthrown, no brain surgery was missed, and while it was inconvenient, it wasn’t fatal. Stuff happens. You learn from it, and move on with life. Those thirty minutes just weren’t enough to eclipse the last week of terrific service, and the knowledge that I wasn’t the one who had to fix it. That’s why I went with a provider, rather than hosting my own stuff.

Keep up the good work folks!

New Hosting

Today, I inked a deal to re-host both of my domains (phydeaux-deauxmayne.net and colin-wright.com) away from my homegrown hosting to a real hosting solution called Dreamhost. The price was right (cheap, but not too cheap!), and it takes some of the reliance on my own infrastructure and fingers to keep things moving away, making my life simpler.

You’re likely to see things not work here and there, and I’ll be working hard in the background to get things percolating correctly again.

Until then, mind the mess, don’t draw lewd things in the dust, and we’ll all get through this! 🙂