Category Archives: Photography

General photography natter — gear, thoughts, ideas, and the odd photo.

The Aperture Is Closing

TrashingApertureMacRumors updated their sub-site for OS X Yosemite to include info about the new Photos app, which appears destined to launch with the next drop of Yosemite.  I’d guess that’ll be in March or April.

Frankly, it’s the time I dreaded.

The news about Photos isn’t good, at least not for me.  Aperture has essentially been deprecated (although it still runs, and likely will for a while), but the ecosystem that keeps it functional will no longer be developed.  No more versions of Aperture are to come, which is very sad.

Several years ago, I was a Lightroom junkie, and loved the product.  However, it didn’t handle geodata very well.  While that’s not the most important thing in the world, it’s pretty dang nice.  And for files that couldn’t take metadata natively (like RAW files), it was necessary to generate sidecar files to carry that info so you could see it from the OS.  That’s all well and good inside the application, but from the OS, it was awful.  When I’d do a Spotlight search for some piece of metadata in my images, I’d get a ton of sidecar files as search results, rather than the actual images.  This meant that I couldn’t see thumbnails for these images in Finder’s display of the results, so I had no idea if the images pointed to by the sidecar files were of Elvis, space aliens or Santa Claus.

And that’s when I made the switch to Aperture.

It wasn’t easy, but I was careful about my exports from Lightroom,  preserving my directory structure that I’d been carrying since 2002, and I got everything into Aperture.  I’ve been way happy with it, and its integration into the Mac OS.  However, with Yosemite, the announcement was made that Apple would have a new application called Photos, and with that, the speculation about what that meant for Aperture (and iPhoto) began.

When that writing hit the wall,  it was obvious that Aperture was going to be shuttered, and with that, there was a huge clatter of noise from pro photographers about moving to Lightroom.  Even Apple said that was the right destination for professional photographers.  And based on what I read on MacRumors today, I’d have to agree.

Photos will not allow plugins, which is a cornerstone for photo editing in most photography applications.  I use Nik, OnOne and other filters in editing my images, and giving up that kind of control and capability within the application is a pretty tough pill to swallow.

And based on what I gather, Photos wants to own the location of my images, meaning that my carefully manicured old-fashioned file folder-based system of filing my images would no longer be supported.  Aperture was happy to deal with that via referenced images, and that was perfect for me.  Call me a control freak, but knowing where things are lets me sleep better at night.

I suspect this is just the tip of the iceberg, however.  I’m betting that if you like iPhoto, this’ll feel like a big ol’ improvement.  For those of us that loved Aperture, this is a big step backward.

So, Lightroom, here I come.  Have the things that drove me to Aperture been fixed?  Can I get all the nuggets of metadata out of Aperture, and into Lightroom?  Well, that remains to be seen.  Adobe has some basic instructions for how to make that migration, and is promising a tool that will make that much more automated.  While I’ve got Lightroom 5 installed, I’m waiting for the tools to catch up to the reality of actually cutting over to Lightroom from Aperture.

For now, I’ll just hide and watch, eagerly awaiting the time to actually make the cutover to Adobe’s Lightroom, and turn out the lights on Aperture for a final time.


There’s No Card Up My Sleeve!

CF Cards
Pick a Card!

With a trip to Florida looming (more on that another time), and finally converging my world onto a new MacBook Pro (more on that another time also), I figured I would do a little prep work for the trip.

For most people, that would mean figuring out what to visit, what to pack, and other trip details. For me, that means speed tests of CompactFlash cards.

(Yeah, I wear my geek on my sleeve.)

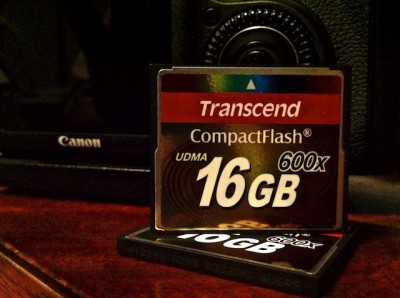
So here’s the deal. I have a Lexar USB 2.0 card reader that’s served me well for years. And within the last year or so, I invested in a couple of pretty dang speedy Transcend 16GB 600x CompactFlash cards. I wanted more capacity, and found these cards on sale for cheap a while back.

Well, with the new laptop, I now have access to USB 3.0 ports, so I picked up a Lexar USB 3.0 card reader. It basically looks the same as the USB 2.0 version, with the exception of the plug difference, distinguishing it as a USB 3.0 device.

While in Florida, I want to shoot some long time lapse series of star trails over the water, and I knew I’d need more capacity for that if I was going to shoot those with my 7D. That led me to look at high capacity cards. I’d been pleased with the other Transcend cards, so I looked to them again. I figured I would shoot for a 64GB card this time, with a thought toward 10-14 hours of shooting at night.

The Transcend 600x card was about $200, with the 400x card being about $100. I didn’t need speed for shooting, but having speed for pulling the images off the card was pretty key. Reluctantly, I went with the 400x card. Doubling the price for a little faster card was something I just couldn’t justify.

Little did I know that I made a great decision.

That’s the backstory. Here’s what I found, when transferring just about 4GB of video files from the cards to the SSD in my MacBook Pro.

USB 3.0 USB 2.0
SanDisk Ultra II 8GB *** 5′ 39″
SanDisk Extreme III 16GB 1′ 29″ 2′ 02″
Transcend 600x 16GB 0′ 47″ 1′ 45″
Transcend 400x 64GB 0′ 31″ 1′ 42″

Yeah, you read that right. The 400x card is faster than the 600x card, which was quite unexpected. Here’s my theory.

I know the 400x card is UDMA 7. The newer editions of the Transcend 600x cards say they’re UDMA 7, but my slightly older ones don’t. I suspect they are likely UDMA 6, and that’s probably why they’re slower. At USB 3.0 interface speeds, there’s not a ton of difference in the times with 4GB of data aboard.

4GB transferred in about 30 seconds. That’s simply amazing. I can remember copying data to/from 5.25″ floppies — 360KB each — and it taking f-o-r-e-v-e-r to move data around. 4GB is something like 11,000 of those floppies, and I can’t imagine how long it would take to move data off those. Of course, I only had a 40 *megabyte* Seagate harddrive at the time, so it would’ve been moot to try it anyway.

How’s that for some vacation planning? 🙂

The Lion’s Meow … and Its Teeth!

The shiny new OS for my Macs — “Lion” — was dropped this week. Through a weird quirk of timing, I was able to get it gratis from the Kids at Cupertino. You see, I bought my new MacMini just a few into an as-of-that-time-unannounced window where you could get Lion for free because your machine shoulda shipped with it… or something like that. Anyway, one redemption code in the AppStore later, and Lion was on the MacMini, and was installable on my other two Macs as well. Woohoo!

The first wart I discovered with was Microsoft’s Remote Desktop Client. I had to “Force Quit” the app a few times, and even bounced the machine before it would finally work. I have no idea what it was doing, but it eventually was functional. Yippee!

The next wart was one I knew about — Quicken. Quicken 2007 for the Mac was a PPC-only app, and with the dropping of Rosetta, PPC apps aren’t supported. Makes sense — it’s been almost six years since the Apple switch to Intel. So one quick online purchase later, and Quicken Essentials — the only version available for the Mac — was on the iMac and purring along. Hooray!

Today, I went on a quest to see what other PPC-only pieces of code I had out there. Surprisingly, there were some. There was The Sims, which I really hadn’t played since I installed it. I evicted ’em.
And then I noticed a bad one: EyeOne.
I bought my EyeOne at DLWS in the fall of 2005 for use in profiling my monitors. It’s a cool tool, and code has been carried along for quite a while, with no big changes. That means the functionality didn’t change, which is good, but with the advent of Lion, the old PPC codebase simply won’t fly. From what I’ve been able to see here and there on the ever-truthful internet, it appears that the new owners of the codebase don’t seem to be real interested in updating the code for us loyal EyeOne users. Bummer. That probably means that a new profiling package is in my future. I had to have to do that, but I don’t know any way around it.

With all that in mind, the upgrade to Lion has cost me $50 for Quicken, and who-knows-how-much for a new profiler … maybe a few hundred bucks?

As for functionality, Lion has a few new things, a redesigned Mail application, and some pretty visual changes that are pleasant to watch. Are there gobs of new things I see as I use my machine for scanning, Aperture, or other things? Not really. I do hate the fact the scrolling is now backwards — now, you “push” or “pull” the content in the direction you want, kinda like a physical piece of paper. Definitely backwards, and makes my transition from work (Windows-centric) to home (Mac-centric). I know you can change that behavior, but if that’s the way Apple’s headed, I kinda wanna go that way too, lest I get caught later needing to learn this new behavior, but under some pressure to get something done!

So for me, Lion’s less of a big cat, and more of kitten. Like with any kitten though, it’s inflicted a little pain that I’m just gonna have to figure out how to heal.

CORRECTION/ADDITION : It appears that X-Rite (who now owns the codebase for the EyeOne) are planning to include support for my device in a new piece of code to be released in September. Of course, it won’t be a free upgrade, and I will have to live without my profiler for a few months. Color me hopeful that this gets resolved both quickly and correctly!

Well, It Ain’t Fireworks…

For a variety of reasons, I didn’t get to any fireworks this weekend. However, with the success of the raindrops under my belt this weekend, I turned my flash to another subject I’d been thinking about.

I set my Carvin Cobalt C350 on a flat surface, and mounted my flash and Canon 7D on a couple of tripods. By using my new DIY cable extension, I had a ton of latitude in placing the flash. I set the flash to strobe at 20hz, and plucked the low E-string, capturing 1/2 second of vibration. I need to try it again, though, as this image didn’t exactly turn out the way I had envisioned, although I do like it.

So my fireworks tonight is a little stroboscopic action, with the aid of some new strings. Enjoy!

Plucking the E-String

Photographing Raindrops (Part 2)

When last we left our intrepid hero, he was inspired by all the rain to figure out how to capture the raindrops as they hit surfaces. He had built an extension cable and housing for his flash… all he needed was rain. Which had apparently abandoned him.

The Setup
The Setup

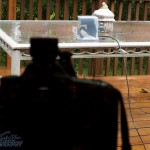
Yesterday, that changed. Big storms came through Da Lou, and put raindrop photography back to head of the photographic class. As you can see in the photo, I deployed my flash in its nifty new housing atop my target table. My thinking was that the water would pool on the table, and with the shallow depth, the drop splashes could be pretty impressive.

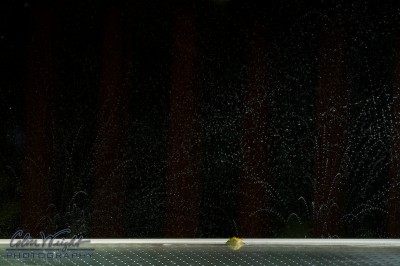
And the rain fell, and fell, and fell. It was a great storm to practice on, with varying amounts of rainfall to experiment with. For most of the shots, I was using my flash on “multi” mode — stroboscopic — at 199hz (199 flashes/second) and 1/128th power. I did this to capture the droplets as they splashed about, and to keep the stress on the flash down.

Lessons learned? Well there were a few:

  • Power for the flash. Replacing batteries pretty frequently really sucked. Not only was I missing shots, but as the batteries drained, the recycle times got longer and longer. Obviously, I need to find an AC power source for the flash.
  • Controlling the droplets. Let’s face it. The rain falls where the rain falls. Predicting that is very tough, so figuring out where to focus is a mess. I had the camera stopped down in order to get a pretty wide depth of field, but that made every single splatter show up, and in some images, it’s hard to figure out what I really wanted the viewer to focus on. I need to find a way of directing the droplets where I want them, at the pace I’d like (in order words, not a vertical river like a downspout gives you) so I can increase my odds of getting decent images.
  • Snoot. The enclosure does a great job of diffusing the flash, lighting up a lot of splatters, and while that’s great for some of the images, for others, it would’ve been nicer to have a focused source of light. A snoot woulda done that, but I’m not entirely sure how I’d manage that with the waterproof housing. Perhaps it could velcro to the outside? Since the snoot would likely be plastic, it probably doesn’t matter much if it gets wet.
  • Spray and pray. As I mentioned above, rain falls on its own schedule and location. This means that I trigger the shutter endlessly, hoping for the best shot to appear in the frame. Ideally, controlling the location of the falling droplets would be great, but barring that, having some way of triggering the camera only when a droplet hits the area of interest would be great. There are ways to do this, but that’s gonna mean more DIY work!

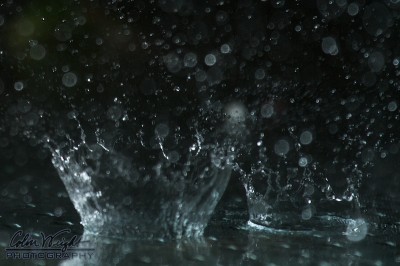
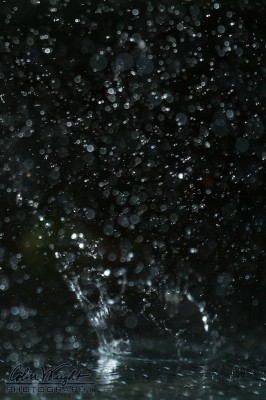
With all that said, enjoy some of the fruits of about 500 images shot, culled down to 100 or so that were “of interest”, and further culled down to just a few that were pretty dang cool right out of the camera (and a little cropping in Aperture). As you can tell by looking at the images, there are some surprises out there. Big splashes, droplets that shimmer in the stroboscopic light like fireworks in the night sky, and all kinds of minutiae that you’d never see without the aid of the camera. Enjoy!


New Work at the Gallery

Yesterday, I trekked to St. Charles, and deposited a boxful of new pieces at Framations. Being framed for the wall are:


Tenaya Creek
Tenaya Creek

Goosenecks
Goosenecks
Comb Ridge
Comb Ridge

Moki Dugway
Moki Dugway

Printed on metal, Sarah and Amy are mounting these images:


Lake Granby #1
Lake Granby #1

Moon over Byers Peak

And finally, I dropped many new works into the sale bins. These images are matted, and ready to be installed in your favorite frame:


Orange Glow
Orange Glow

Zig-Zag Bridge
Zig-Zag Bridge
River of Leaves
River of Leaves
Leaves in Decay
Leaves in Decay
Bel Air in Motion
Bel Air in Motion
Mandolin Bridge
Mandolin Bridge
Claw of Ice
Claw of Ice
Road Less Traveled
Road Less Traveled
Pink Skies, Monument Valley
Wagon Wheel
Wagon Wheel
Bridge Pins
Bridge Pins
Aspens in Fall
Aspens in Fall
Mine Entrance
Mine Entrance
Patriotic Building
Patriotic Building
Balanced Rock
Balanced Rock
Patriotic Cadillac
Patriotic Cadillac

Reflection in Blue
Reflection in Blue

As always, these images — and many others! — are available at my online gallery.

Photographing Raindrops (Part 1)

Saturday morning, we had some big ol’ storms come through Da Lou. They woke me around 5am, and with the house quiet with sleep, I decided to shoot some raindrops from the storm.

I found that the rain was moderating as I was setting up, and by the time I was ready, we were down to drips of rain. Still, it was a good opportunity to play. Now, the sky was really dark due to the clouds still over us, and that drove me to crank the ISO up on the shots. The Canon EOS 7D can make some acceptable images at high ISO, but with pretty dark conditions already, and a need to have a decently deep depth of field… well, my images weren’t quite where I wanted ’em to be.

So, I started thinking about flash for the drops. The forecast was for more rain, so I started puzzling out how I might add my Canon 580 EX II flash into the picture. (Pardon the pun.) The more I thought about improving my shots, the more I thought I’d wanna take advantage of the wireless capabilities of this flash when used with my 7D. This would let me put the light where the drops are falling. All good.

My brain sometimes will get just a little too far down the path, and this morning was no exception. I thought, if just a flash was nice, why not use the strobe feature from my flash? That might make for some interesting shots, freezing the action over and over again in the same frame. Well, it was a great idea while it lasted. You see, you can’t use the strobe feature on the 580EX wirelessly. D’oh!

That meant going wired. The only extension cable I had was a curly job, maybe 12-18″ long, and nowhere near long enough for what I needed. You see, I wanted to put the flash outside, and keep the camera inside and dry. (But won’t the flash get wet? I’ll get to that in a bit.)

I looked around the ‘Net, trying to find anything about extending the reach of my hotshoe cable. I found an article at Vu Le Photography that described how to use a pair of wall-mount Cat5 receptacles to extend a hotshoe cable using a simple Cat5 cable. A quick run to Home Depot, along with getting up the guts to cut my not-inexpensive cable in two, and I was ready to go. The instructions were clear, and inside 30 minutes, I had a extendable cable.

I connected the Cat5 cable between the two ends of my previously intact cable, and… it worked! I was able to use the strobe mode on my flash from afar.

Remember I said I was gonna leave my flash out in the rain? I figured I needed to find a container to enclose the flash, keeping it dry, while still having it near the raindrops. I thought about buckets, and other kinds of rainshields. And then I went in the kitchen… One of Becky’s Lock&Lock containers — a tall 1.5L container, perhaps this one — was the perfect size to hold the 580EX, and hold it upright! In fact, I could even put the all the cable connections inside the container. I cut a small notch in the lip to let the Cat5 cable pass through, and on the bench, it all works.

With storms coming tonight and tomorrow, I should have a chance to put it to the test. We’ll see if all the work will pay off!

Stay tuned…

New Gear : Transcend 600X 16GB CompactFlash Card

Transcend 600x CF
Transcend 600x CF

B&H Photography has graced me with some new CF cards — a pair of Transcend 16GB 600X cards!

I’ve been pining for new cards for a while. My largest card — a Sandisk 16GB Extreme III — was plenty fast enough in my 40D, but was lacking on the 7D. When I shot the Three State Three Mountain Challenge from Mom’s driveway a few weeks ago, I kept having to pause to let the buffer on the camera clear. Admittedly, I was shooting RAW (probably shoulda been shooting JPEG), and was shooting big bursts as the cyclists went by… but still… waiting for the buffer to clear was painful. Since it was just an experimental shoot for me, there was nothing lost by having to wait occasionally. Doesn’t mean I enjoyed waiting!

I’ve been looking at faster CFs since I bought my 7D over a year ago. I don’t often need speed, so I haven’t really pursued it real hard. I’d seen a tweet from someone extolling the virtues of the relatively new Transcend cards, and that piqued my interest again. When I was at the Canon EOS Immersion Seminar last weekend, Transcend’s name came up again, alongside Lexar and Sandisk. My fate was cast. If the folks representing Canon, who told us to use good cards and beware the cheap stuff, still had Transcend up on the big screen with the big kids of flash cards, then that was good enough for me.

The cool thing about these cards is the price. B&H has ’em for about $75/ea for 16GB cards. At 32GB, they’re more than twice the price of the 16GB’s. The good news is that at $75 for 16GB, they are way under half the price of their Sandisk counterparts.

And BTW, for me, going to 32GB cards sounds attractive, but if I lose a card — which in nine years of shooting has never happened (except for the old microdrive cards, which were disastrous for me) — I simply lose too much at 32GB. And frankly, it’s rare that I can’t take the time to change cards. My subjects just ain’t that dynamic typically!

So, how’s the performance?

In camera, they seem pretty dang fast. Compared to my Sandisk 16GB card, I overran the buffer after about 23 shots and started pausing between images. However, the buffer seemed to clear much more quickly with the Transcend than the Sandisk. Shooting JPEG, the difference was much more pronounced.

Shooting large JPEG, the Sandisk card gave me about 28 seconds of shooting (approx 200 images) before there was a pause. The Transcend card? Well, let’s just say that I stopped after 40 seconds (approx 280 images). I mean, when am I gonna shoot 40 seconds solid of something?!

I’m pleased so far, and can’t wait to get this little guys out in the field. If they pan out like they appear they could, I’m pretty sure there’ll be more of ’em in my bag, replacing some cards that are long-in-the-tooth.