Tag Archives: Lightroom

The Aperture Is Closing

TrashingApertureMacRumors updated their sub-site for OS X Yosemite to include info about the new Photos app, which appears destined to launch with the next drop of Yosemite.  I’d guess that’ll be in March or April.

Frankly, it’s the time I dreaded.

The news about Photos isn’t good, at least not for me.  Aperture has essentially been deprecated (although it still runs, and likely will for a while), but the ecosystem that keeps it functional will no longer be developed.  No more versions of Aperture are to come, which is very sad.

Several years ago, I was a Lightroom junkie, and loved the product.  However, it didn’t handle geodata very well.  While that’s not the most important thing in the world, it’s pretty dang nice.  And for files that couldn’t take metadata natively (like RAW files), it was necessary to generate sidecar files to carry that info so you could see it from the OS.  That’s all well and good inside the application, but from the OS, it was awful.  When I’d do a Spotlight search for some piece of metadata in my images, I’d get a ton of sidecar files as search results, rather than the actual images.  This meant that I couldn’t see thumbnails for these images in Finder’s display of the results, so I had no idea if the images pointed to by the sidecar files were of Elvis, space aliens or Santa Claus.

And that’s when I made the switch to Aperture.

It wasn’t easy, but I was careful about my exports from Lightroom,  preserving my directory structure that I’d been carrying since 2002, and I got everything into Aperture.  I’ve been way happy with it, and its integration into the Mac OS.  However, with Yosemite, the announcement was made that Apple would have a new application called Photos, and with that, the speculation about what that meant for Aperture (and iPhoto) began.

When that writing hit the wall,  it was obvious that Aperture was going to be shuttered, and with that, there was a huge clatter of noise from pro photographers about moving to Lightroom.  Even Apple said that was the right destination for professional photographers.  And based on what I read on MacRumors today, I’d have to agree.

Photos will not allow plugins, which is a cornerstone for photo editing in most photography applications.  I use Nik, OnOne and other filters in editing my images, and giving up that kind of control and capability within the application is a pretty tough pill to swallow.

And based on what I gather, Photos wants to own the location of my images, meaning that my carefully manicured old-fashioned file folder-based system of filing my images would no longer be supported.  Aperture was happy to deal with that via referenced images, and that was perfect for me.  Call me a control freak, but knowing where things are lets me sleep better at night.

I suspect this is just the tip of the iceberg, however.  I’m betting that if you like iPhoto, this’ll feel like a big ol’ improvement.  For those of us that loved Aperture, this is a big step backward.

So, Lightroom, here I come.  Have the things that drove me to Aperture been fixed?  Can I get all the nuggets of metadata out of Aperture, and into Lightroom?  Well, that remains to be seen.  Adobe has some basic instructions for how to make that migration, and is promising a tool that will make that much more automated.  While I’ve got Lightroom 5 installed, I’m waiting for the tools to catch up to the reality of actually cutting over to Lightroom from Aperture.

For now, I’ll just hide and watch, eagerly awaiting the time to actually make the cutover to Adobe’s Lightroom, and turn out the lights on Aperture for a final time.


2010 and My Tech

Braddog has a yearly tradition of reviewing the tech that has shaped his year just passed. I was inspired to do the same!

#1, iPad. I had no idea that it would become so pervasive in my life when I bought it.

#2, DVR. I snuck into the late 90s this year by switching to UVerse, and gaining use of their DVR technology. Again, I had no idea just how much I’d be using it!

#3, AppleTV. A new addition this year, and one that has not only entertained my not-so-techhy wife during her recovery from foot surgery, but has also converged a lot of varied and entertaining content in a room that had none.

#4, iMac i7. This new machine could’ve been ranked higher, as I use it daily for so much of my online life. But the real gain here was real estate. I displaced a eight-core MacPro, gained a bigger screen, and lost almost no processing power.

#5, Lightroom 3. This software jewel has become my electronic shoe box of photos. I keep a personal library of just over 100k photos (yeah, I’m a pack rat), along with an archive of old family photos from both sides of the family. Lightroom makes it just flat easy to maintain all this, and keep some sanity around finding images that I’ve shot, along with history that others in my family have captured.

And yes, you could put guitars on the list, but my guitars are acoustic, and despite having some electronics in them, and occasionally being pumped through my Marshall amp, I didn’t feel like they fit in the list.

It’ll be cool to see what 2011 holds for me. Will there be any fundamental shift as big as the iPad in the cards for this year? Who knows, but I can’t wait to see!

Big Upgrade Day

Unless you live under a rock, you’ve already heard that iPhone 4 has been announced today. And I want one. Period. AT&T was “nice” enough to move up my upgrade date, so I’m eligible for an upgrade immediately.

So what do I like about the new iPhone? Well, the design is really industrial, a look I really love. Video calling — “FaceTime” — looks quite cool, although the reliance on wi-fi for that seems like a bad thing. I suspect that it is bandwidth intensive, and that’s keeping the 3G use of it at bay. At least until Apple thwoks AT&T about the head and shoulders. 🙂

I like the new camera, along with the capability to record 720p HD video and edit the video right on the phone. That’s way cool. And then there’s the big ol’ display. Well, it’s not actually bigger, but it’s got well over twice the pixel density of the old phone. Shweet. I’ve gotta think that come June 15th, I’ll be pre-ordering.

Now if I can just find someone who wants my iPhone 3G….

The other upgrade just released tonight is Lightroom 3. This has been in beta for quite a while, and it looks like it’s finally ready for primetime. I’m thrilled, and need to look into that upgrade, too. More on that later.

Gettin’ RAW

As I’ve delved more and more into the RAW images coming from my Canon EOS 7D, I’ve discovered that Adobe Camera RAW 5.6 just ain’t cutting it for me. The preview JPG images I briefly see in Lightroom 2.6 look much more like what I expect from my images, rather than the post-ACR images that are actually used for real work. Digital Photo Professional came with the 7D, and it sure seems to kick ACR’s backside with its RAW conversion routines. Now, there are folks out there who say that the camera manufacturer (in this case, Canon) should have the inside track on RAW conversion, and historically, I’ve just taken that as hype. Color me a believer now.

With the advent of the new year, I’ve decided to whittle away a bit of time to do some searching and comparing of various RAW converters for the Mac platform. Most of these comparisons will be done on a non-stellar image of a seagull shot last weekend at Winfield, and will be done with trial versions of the various packages on hand. I know other folks have done these kind of comparisons before, but frankly, they aren’t me, and the images aren’t mine. In other words, YMMV. Lather, rinse, repeat. 🙂

This ain’t exactly scientific, and everything I’m describing and posting is my own experiences with my Snow Leopard-based MacBook Pro running 10.6.2. The source image was shot with my 7D, my 100-400L at 400mm, handheld, IS on, f/5.6, 1/400 sec, ISO 400, and “cloudy” white balance selected. It was a grungy day, and the gull was at some distance over the river.

I’m sure there are settings I can change here and there to make some of these images better in these various packages, but that’s not the point. I’m ready, willing and able to work on my images to get them polished how I’d like, but running with default settings from these various converters is how I’d like to start. If I start out closer in the conversion process to how I expect the image to look, then that’s (potentially) less work in front of the screen, and more time left for photographing.

Where I could, I’ve tried to do my screen captures from a 100% rendering of the sample image. For each app, I did screen grabs from within the app’s UI as TIFFs using the Mac’s built-in Grab utility.

All that said, here goes.

Digital Photo Professional 3.7.3.0

DPP 3.7.1.2 shipped with my 7D, and the only thing that’s bugged me is a problem with the preferences panel causing the software to abend whenever it’s accessed. There is a solution that I found here on an Apple forum that absolutely fixes the issue. However, there is also v3.7.3.0 version of code available, and for this test, I downloaded it from Canon to see how it fared. I still don’t like that the Canon software requires a reboot of the Mac in order to function correctly (so it claims). I mean, really, reboot the machine? But the good news is the v3.7.3 does solve the preference panel problem.

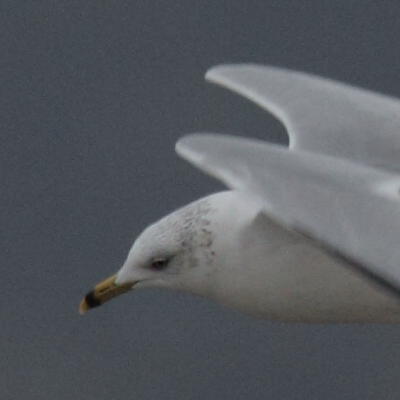
As a point of reference, the image in DPP compares pretty favorably to the embedded JPGs I would see briefly in Lightroom 2.6. In other words, this is the look I was seeing on camera (again looking at the JPGs according to how I understand things to work) and briefly in LR 2.6, and this is the look I was disappointed to lose inside LR after ACR did its work.

Below is the crop of the image from DPP.
Adobe Camera RAW 5.6

This is what started the whole fuss for me. Well, actually, it was Lightroom 2.6, which uses ACR 5.6 as its underpinning for processing RAW files. However, to be fair, I wanted to pull ACR 5.6 away from LR 2.6, just to ensure that there was no hocus-pocus going on with LR 2.6.

To my eyes, there’s a significant color shift or darkening — not sure which. It’s very noticeable in the background. There also appears to be quite a bit more noise in the image, although some/all of that could be the fault of the color shift. However, the noise could be being introduced due to some kind of sharpening. If you look at the top of the gull’s head and compare it to DPP, it’s definitely sharper, but I’m afraid the cost for that may be too high.

Below is the crop of the image from ACR.
Lightroom 2.6 + Adobe Camera RAW 5.6

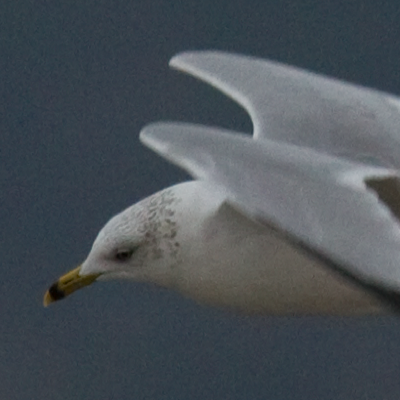
After finally understanding (I think) why my RAW images looked great upon import into LR 2.6 (the embedded JPG previews were being shown) and worse after a few seconds (after LR engaged ACR to properly process the RAW file), this is what I was left with. Blecch.

From what I can tell, there’s no huge difference between images in ACR 5.6 and LR 2.6+ACR 5.6, although the one through LR 2.6 may be a tad lighter.

Below is the crop of the image from LR 2.6.
Lightroom 3.0β + Adobe Camera RAW 6.0

Adobe is working on a pretty big revision to Lightroom, and currently there’s a beta version of it, along with a new Adobe Camera RAW to go along with it. For me, one of the biggest wins with LR 3.0 may be some changes to help handle large catalogs. At this point, I don’t know what that’s gonna look like, but it definitely piques my interest.

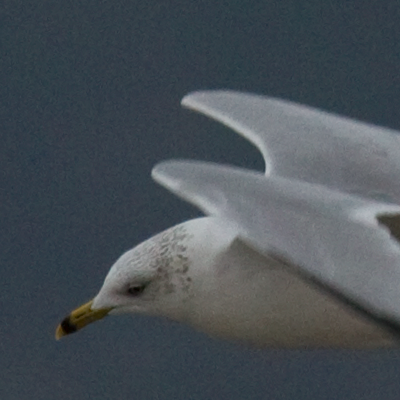
From a RAW processing perspective, there’s a little bit of difference between LR 2.6+ACR 5.6 and LR 3.0β+ACR 6.0. LR 3.0β seems to have a “different” kind of noise in the background — speckly instead of blotchy. The gull’s head appears just a tick brighter to me, as well. I probably like the speckles better than the blotches, but it’s still not as good as DPP to me.

Below is the crop of the image from LR 3.0 Beta.
Apple Aperture 2.1.4

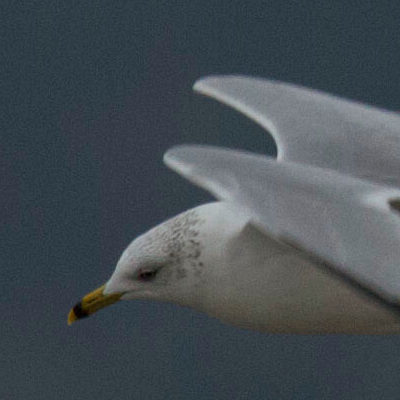
Apple has its own rendering engine for dealing with RAW files, and it has recently been updated to deal with the 7D’s RAW files. Frankly, I like the look of this image better than through Adobe’s products. It’s still just a tick darker than the image through DPP, but would probably not have sent me on this quest had this been the result through LR 2.6+ACR 5.6.

Below is a crop from Aperture.
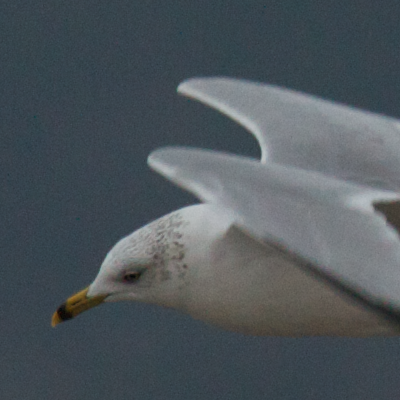
Preview 5.0.1

It’s my belief that both Aperture and the Snow Leopard share the same engine for converting RAW files, but I figured it made sense to include a pretty common display engine for RAW files. I can’t imagine that Preview would be part of my workflow, but until you look at it, ya never know!

To my eye, there’s not much difference between the image in Aperture and Preview. Perhaps they really are using the same engine underneath.

Below is a crop from Preview.
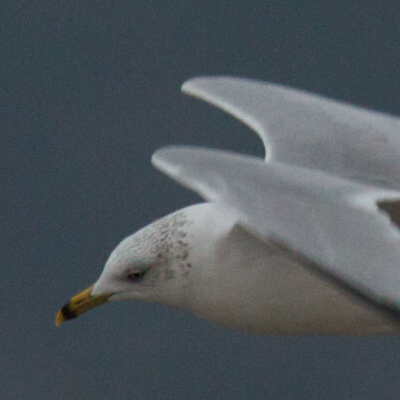
Silkypix 3.0.34.1

Before I’d started this quest today, I’d never heard of Silkypix. Their engine seems to still be better than Adobe’s, but there’s still a darkening as compared to DPP that I don’t care much for.

Below is a crop from Silkypix.
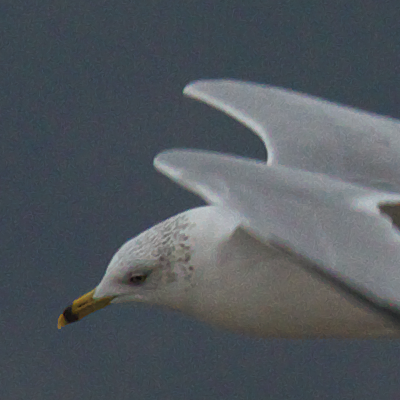
DxO Optics Pro 5.3.6

I’ve seen DxO advertised for a long time, and hadn’t really thought of it as a RAW converter. In my head, it was a bigtime piece of code that could take lens characteristics and deal with those in an image. From doing the installation today, I’ve learned that it can handle specific camera and lens combinations, and convert RAW files based on their profile data. Pretty cool stuff.

The installation for DxO is much more complex, allowing you to select only the bodies and lenses that you might run into. I think that’s probably a good thing, and I imagine it probably cuts down on the disk utilization.

I’ve gotta say, DxO really rocked out the image. The gull is clean, bright and crisp. It almost looks as though it applied some kind of auto-balancing to the image — it is a dark image, after all. It looks the way I would expect it to be processed eventually anyway, and that’s pretty cool.

Below is the crop from DxO Optics Pro.
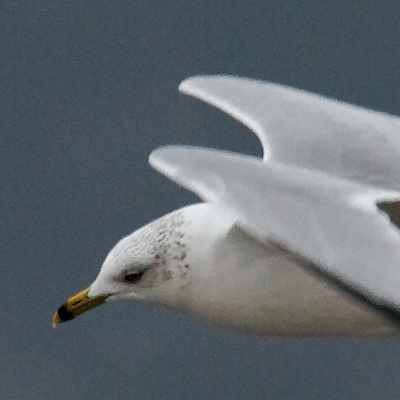
Capture One 5.0.1

Capture One is another name that’s familiar to me from adverts. I’ve read about loads of folks using them for their conversion, and I wanted to give them a whirl to see what the hubbub was about.

Comparing the images from DPP and Capture One, I notice the same things in the Capture One image that I liked about the DxO-based image. However, comparing the DxO and Capture One images, the DxO image looks “hot” to me. Add to that that the detail atop the gull’s head appears clearer in the Capture One image, suddenly Capture One starts to look pretty attractive.

Below is the crop from Capture One.
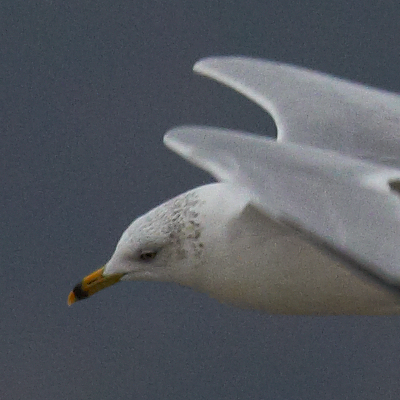
RAW Developer 1.8.7

This was another tool I’d never heard of before. To my eye, it appears much like the ACR-based images. Unfortunately, that’s just not the look I’m looking for.

Below is the crop from RAW Developer.
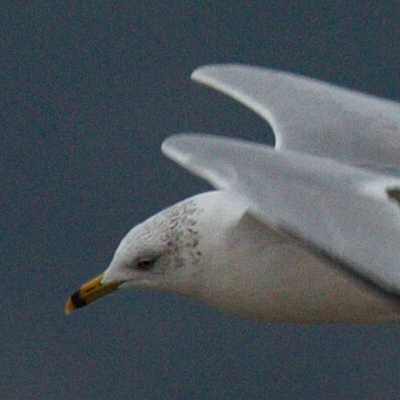
RAW Photo Processor 4.0.1

Yet another tool I’d never bumped into before. RPP seemed to make my image quite dark compared to DPP. I couldn’t compare the sharpness too well, as I couldn’t figure out how to get to a 100% image in the UI. I’m sure there’s a way, but it wasn’t obvious to me.

Below is the crop from RPP.
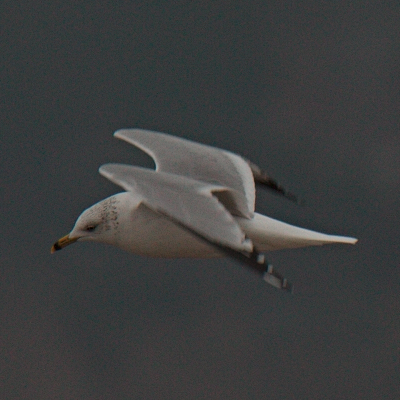
Observations

To me, from the out-of-the-box experience, I see it as a three horse race: Digital Photo Professional, DxO Optics Pro, and Capture One. Comparing the three images, I really like the one from Capture One the best. It appears that Capture One is doing some sharpening, but it’s not crazy high, and appears to make the image a little nicer overall.

Both DxO and Capture One do have a little color shift to the blue, which leads me to believe that they are doing some kind of tweaking of the white balance. It’s not horrid like ACR’s though, although it appears to be of a similar nature, strictly based on the color of the background.

I’d bet that both DxO and Capture One could be tweaked a bit to get images that look like the ones from DPP. So why switch? Well, DPP is really clunky and slow. I’d like to see something fill my harddrive with TIFFs a bit quicker than DPP can manage.

However, DPP is free — well, it came with the camera, so “included” is probably the better term. DxO is running a special for $109 through Tuesday for v5.0.1 standard edition (which supports the 7D) and will include a free upgrade to v6 when it hits for the Mac later this year. Capture One 5 is $129. Frankly, I’m seduced by what DxO claims it can do with lens/camera profiling. Capture One appears to be able to do that in the Pro edition, but that’s nearly $400.

I’ve got a couple of weeks before the demo versions run out, but with the sale at DxO running, I guess I’ll spend some time tomorrow running some comparisons on batch processing. Stay tuned!

Canon 7D and Software Updates

Having had my Canon 7D for a few weeks, I can safely say that I really like it. Not yet love it, but I like. Why not love? Well, I just haven’t had enough time to exercise it enough to fall in love. I’m in love with its potential, but I haven’t realized that potential practically yet. Mine own dang fault… along with the fact that there’s only 24 hours in a day. Dumb ol’ plantary rotation.

One thing that frankly had kinda slowed me down from getting too far down the path for making gobs of shots was that Apple’s Snow Leopard and Adobe products weren’t quite there with support for the new RAW format from the 7D. There’s been a release candidate for Lightroom that supported it, but after reading some of the forum info about that RC, I was concerned that I might end up having to re-import my images or some such nonsense to get them correctly rendered in the future production version of LR when it was released.

Today, both issues are solved: Adobe has released LR 2.6 officially, and Apple has update Snow Leopard to handle the 7D’s RAW files. Both are great news for me, and just in the nick of time.

Tomorrow morning, a gaggle from work are getting together at Forest Park to photograph, and it’ll be the first real world test for me with the 7D. Now that my tools are up to snuff for reading the images I’ll create, that just makes the pot sweeter. Woo-hoo!

I’d be remiss if I didn’t put my Grandpa Simpson voice on and mention the speed of the upgrades. I was downloading the almost 100MB upgrade to Lightroom at just a tick over 1MB/sec. That would’ve been just about one 3.5″ floppy disk every second for just under two minutes. It’s crazy to think about moving that kind of data around that quickly. And man, am I loving it!

Now to go to the camera store and see if there’s any used lenses I need! 🙂

Snow Leopard! Genuine Fractals! Oh, the Humanity!

I was sitting around today, when my iPhone jingled, telling me that I’d received an e-mail. It was a monthly newsletter from OnOne about their products. I’m a Genuine Fractals 6 Professional user. I don’t use it real often, but when I do, I need it.

So what was the topmost bullet in the newsletter? A strong suggestion to deactivate OnOne products before upgrading OS X to Snow Leopard. Eh? Really?

And with my next breath, I realized that the newsletter was telling me that GF6 was not going to work until I contacted customer support. Period. Oh fudge. Only I didn’t say fudge.

Being in Missouri, there was a healthy dose of “show me”, and I tried GF6 in Photoshop CS4E and Lightroom 2.5… no dice. What I read was right — I was hosed.

So now I’m waiting for OnOne to respond with a hopefully painless way to salvage my investment in GF6.

Frankly, activation that is that deeply rooted in the OS seems a little overboard. The product’s great — nothing else can touch it — so I suppose it’s worth the pain, but I’m blown away that an OS upgrade can cause this kind of problem. Sure wish I’d had this info before I’d done the upgrade — and I’m betting that OnOne does too. It looks like they’re fielding quite a few questions on this one.

Stay tuned.

Cross-Polinization

One of the challenges with having a collection of images for sale is figuring out how to handle the mechanics and fulfillment of the sale. Zenfolio is helping me with that end of things, and after a test order, it seems to be working as expected. The next hurdle is getting the word out about my images. After all, a harddrive full of images won’t generate a penny of sales if no one knows they’re out there. I don’t have a gazillion-dollar budget to advertise during major sporting events, so I’m trying to spread the word in other ways. Here’s how I’ve decided to get the word out.

BTW, this post is not a workflow for image processing. For purposes of this discussion, I assume the finished image has been processed using your favorite tools, and you have it in a “ready to print” configuration. Everyone seems to have their favorite way of doing those things, so I’ll leave that part alone for now. However, for me, making sure that my images have good keywords, title and caption, along with copyright metadata goes a long way to making things smoother. You’ll see why in a minute.

For me, my workflow goes through Adobe Photohop Lightroom, and fortunately, there are some nice plugins to help make things smoother. With ready-to-print images in hand, I use a plugin by Jeffrey Friedl to upload images to Zenfolio — one of many plugins he’s authored. Also, within this plugin, I can built new galleries, and can even use Twitter to announce the new uploads. I don’t usually do that, however; more on that in a bit. One thing to note, if I’ve got all the image metadata in place that I mentioned above, Zenfolio populates the title, caption, keywords and copyright fields straight from the image. One less thing to fuss with.

Jeffrey also has a plugin for Lightroom that will send images to Flickr, along with creating new sets or dropping images in current sets. I’ll export my images there, albeit somewhat smaller — 72dpi and about 1000px on a side, along with a copyright watermark. Like Zenfolio, Flickr will also pick up the title, caption and keywords straight from the metadata. Now the image lives in two places, and I’ve accomplished that right from Lightroom in just a couple of minutes. That may sound like a lot of work, but once it’s setup, it’s really easy, and can be done in batches, magnifying the time savings.

Now that I have the image on Zenfolio, I can use the “share” feature to generate a hotlink for a watermarked, nice-sized image for this blog, along with a link to the Zenfolio page where it can be purchased from. Using these bits, I write up something here, and publish it out. Now the image is on Zenfolio and Flickr, and has been announced on this blog.

Inside Zenfolio, there are buttons for Facebook and Twitter. Using those, I’ll put an announcement on my Facebook wall, and throw a tweet into the Twitter-stream with a shortened link and the hashtag #photog. This will put it in front of folks that are watching for photography releated tweets.

I also have installed widgets on my personal blog that will pick up on new items in Flickr, as well as displaying random images from my Zenfolio presence. This keeps my images in front of folks that might discover me through some other writing that I’ve done.

Lastly, I have a static message in the “what am I working on” section at my LinkedIn account that points to the gallery hosted on Zenfolio. LinkedIn doesn’t have the same kind of “history” that you see with a Facebook wall, so updating it every few days with links to new images doesn’t seem to make much sense to me.

So that’s it. By the time I’ve gone through this process, I have the image displayed in four places (this blog, my personal blog, Zenfolio and Flickr), I’ve referenced it in social media (Facebook and Twitter), and have some possible exposure coming through LinkedIn.

Is this working? Well, I don’t know yet. It’s just started this week, so the results aren’t clear yet. In any case, it certainly is getting the harddrive full of images out there where folks can find them, and that’s better than just sticking ’em in a desk drawer!

The Patient Survived!

Doc Oc has his new OS and apps loded. Yahoo! In this entry, I’m gonna try to capture the things I’ve modified/augmented, so next time I have to do this, I can deal with it from a documented position.

My basic plan was to keep things clean, only installing things I use, and trying hard to avoid importing settings and drivers from the old boot drive, which takes the Migration Assistant out of the mix… generally.

  • >Documents and Stuff : I have loads of this kind of thing… ya know, Apple commercials, some images (not my photo library; that’s on another spindle), genealogy stuff, etc. Migration Assistant seemed like it would move all this, but I really wanted to do it myself, as I’m not comfortable with Migration Assistant’s scope, and knowing just much it would copy.
  • Mail : Mail is a biggie for me. I archive waaaaay too much mail in my mailboxes, and it’s always been one of those things I’ll fix “one of these days”. Today is not that day. So how to get my mail setup manually? I copied /Users/me/Library/Mail and /Users/me/Library/Mail Downloads to the newly installed OS image. I also copied /Users/me/Library/Preferences/com.apple.mail.plist, and after getting everything over, I opened Mail, and there was everything. The only thing that wasn’t in place was my passwords, which isn’t a big surprise.
  • Adobe Applications : I fully expected CS3 to bark about being reinstalled on the same machine, but apparently it was smart enough to figure it out. I saw several other apps that somehow knew their license serial numbers, and worked well. In fact, the only app that I had to “deactivate” and “reactivate” was Genuine Fractals 6.
  • iTunes : I have had challenges in the past with moving my iTunes library around. This go ’round though, I had no problems. I use an alias to point to the library location, and once I repointed that, iTunes was all smiles.

At this point, Doc is happy again, although I’m sure I’ll run into things here and there that aren’t quite as they were. However, all things considered, I’m happy with where things are right now… Especially given all the “learning experiences” that were part of this!!

It’s Alive!

After 10 hours of data wending its way across the wire from Doc Oc to the new Seagate half-TB, I was ready to try out the new catalog and files on my MacBook. With two machines, it made testing this really easy — try it on the laptop first, fix any catalog problems, and then try it on the Octoputer.

After copying the images, and copying the catalog, I plugged the drive up to the laptop, and found that the catalog was disconnected from the images. I had to point the catalog to the images, but after that, everything was cool.

Shut down LR on the MacBook, move the drive to Doc Oc, and all is well there too. Overall, a very easy operation. I still have some scripting to do to automatically back the thing up when it’s docked at Doc Oc’s, but that shouldn’t be a big deal.

This opens the door to two other portable drive based projects — one for iTunes, as it sure would be nice to have that with me when travelling, and another for my scanning projects. Those I’d like to turn into another LR catalog, making it especially easy to carry that stuff around to relatives to get the skinny on the images.

It’s definitely a new world for me! Now, if Apple would just release a video card for the MacPro that’ll run their new 24″ LED monitor…..

New Gear: Seagate FreeAgent|Go 500GB External Hard Drive

Every now and then, I go through a little panic attack as I see all the hardware around the digital darkroom, and I begin to ponder simplifying my digital world. Ultimately, I have a ton of storage needed (easily 2-3TB, including hot backups) for my photos, videos and other digital artifacts, but not that much processor power needed for my normal work, despite having a mongo big octocore beastie under the desk.

So with the new MacBook Pros having been released a few weeks ago, my brain yet again started spinning on shrinking my technological footprint. However, my stalwart partner in crime remained the voice of reason, and talked me off the Luddite ledge.

Still, there are some real good reasons to be down to one machine — at work, it’s what we call “a single version of the truth.” In other words, there’s only one place with my e-mail, master photo library, etc. With the big machine at home, and my MacBook on the road, it’s hard to keep a single version of the truth. I really banged into this when we were on the road in June as I tried to get my e-mail while letting my big machine get it too. A single version of the truth is a compelling concept for me.

Alas, with the permission of my CFO in hand to go forth and simplify, but the suggestion of said CFO that she knows me better than I do, and that I might just rue the loss of my eight-core beauty, I kept the concept of one version of the truth, but decided to tackle it differently. Enter the new purchase tonight.

So here’s the concept, strictly for the photo library. (I’ll tackle the e-mail problem another day.) Get an external drive, export my master library and LightRoom catalog to the drive, and use that copy as the master between Doc Oc and The-Little-MacBook-That-Could. Backups of that data would happen automatically whenever the drive is connected to Doc Oc overnight, and be stored in Doc, which is the copy that Becky accesses from her machine.

So, I have the hardware now, and only have to work through the conversion process. However, I do have one concern…. speed. With the little laptop drive inside the FreeAgent, and connected at USB 2.0 speeds, I could see where there might be a potential bottleneck. However, it’s rare that I do massive big things to the catalog, and LightRoom 2 performs pretty well, so that might be ok.

Stay tuned as I build out this little experiment of technological terror….